mirror of
https://github.com/sun-guannan/CapCutAPI.git
synced 2025-11-25 03:15:00 +08:00
298 lines
8.3 KiB
Markdown
298 lines
8.3 KiB
Markdown
# 通过CapCutAPI连接AI生成的一切 [在线体验](https://www.capcutapi.top)
|
||
|
||
<div align="center">
|
||
|
||
```
|
||
👏👏👏👏 庆祝github 800星,送出价值8000点不记名云渲染券:040346B5-8D8F-459E-8EE7-332C0B827117
|
||
```
|
||
</div>
|
||
|
||
## 项目概览
|
||
|
||
**CapCutAPI** 是一款强大的云端 剪辑 API,它赋予您对 AI 生成素材(包括图片、音频、视频和文字)的精确控制权。
|
||
它提供了精确的编辑能力来拼接原始的 AI 输出,例如给视频变速或将图片镜像反转。这种能力有效地解决了 AI 生成的结果缺乏精确控制,难以复制的问题,让您能够轻松地将创意想法转化为精致的视频。
|
||
所有这些功能均旨在对标剪映软件的功能,确保您在云端也能获得熟悉且高效的剪辑体验。
|
||
|
||
### 核心优势
|
||
|
||
1. 通过API的方式,提供对标剪映/CapCut的剪辑能力。
|
||
|
||
2. 可以在网页实时预览剪辑结果,无需下载,极大方便工作流开发。
|
||
|
||
3. 可以下载剪辑结果,并导入到剪映/CapCut中二次编辑。
|
||
|
||
4. 可以利用API将剪辑结果生成视频,实现全云端操作。
|
||
|
||
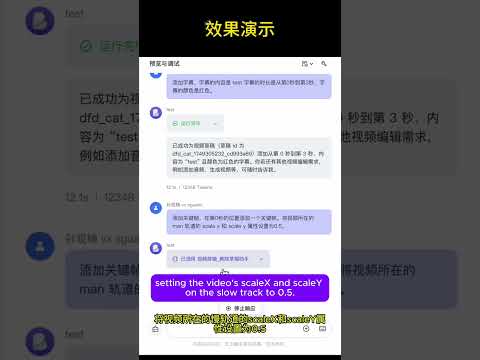
## 效果展示
|
||
|
||
<div align="center">
|
||
|
||
**MCP,创建属于自己的剪辑Agent**
|
||
|
||
[](https://www.youtube.com/watch?v=fBqy6WFC78E)
|
||
|
||
**通过CapCutAPI,将AI生成的图片,视频组合起来**
|
||
|
||
[](https://www.youtube.com/watch?v=1zmQWt13Dx0)
|
||
|
||
[](https://www.youtube.com/watch?v=IF1RDFGOtEU)
|
||
|
||
[](https://www.youtube.com/watch?v=rGNLE_slAJ8)
|
||
|
||
</div>
|
||
|
||
## 核心功能
|
||
|
||
|
||
| 功能模块 | API | MCP 协议 | 描述 |
|
||
|---------|----------|----------|------|
|
||
| **草稿管理** | ✅ | ✅ | 创建、保存剪映/CapCut草稿文件 |
|
||
| **视频处理** | ✅ | ✅ | 多格式视频导入、剪辑、转场、特效 |
|
||
| **音频编辑** | ✅ | ✅ | 音频轨道、音量控制、音效处理 |
|
||
| **图像处理** | ✅ | ✅ | 图片导入、动画、蒙版、滤镜 |
|
||
| **文本编辑** | ✅ | ✅ | 多样式文本、阴影、背景、动画 |
|
||
| **字幕系统** | ✅ | ✅ | SRT 字幕导入、样式设置、时间同步 |
|
||
| **特效引擎** | ✅ | ✅ | 视觉特效、滤镜、转场动画 |
|
||
| **贴纸系统** | ✅ | ✅ | 贴纸素材、位置控制、动画效果 |
|
||
| **关键帧** | ✅ | ✅ | 属性动画、时间轴控制、缓动函数 |
|
||
| **媒体分析** | ✅ | ✅ | 视频时长获取、格式检测 |
|
||
|
||
## 快速开始
|
||
|
||
### 1. 系统要求
|
||
|
||
- Python 3.10+
|
||
- 剪映 或 CapCut 国际版
|
||
- FFmpeg
|
||
|
||
### 2. 安装部署
|
||
|
||
```bash
|
||
# 1. 克隆项目
|
||
git clone https://github.com/sun-guannan/CapCutAPI.git
|
||
cd CapCutAPI
|
||
|
||
# 2. 创建虚拟环境 (推荐)
|
||
python -m venv venv-capcut
|
||
source venv-capcut/bin/activate # Linux/macOS
|
||
# 或 venv-capcut\Scripts\activate # Windows
|
||
|
||
# 3. 安装依赖
|
||
pip install -r requirements.txt # HTTP API 基础依赖
|
||
pip install -r requirements-mcp.txt # MCP 协议支持 (可选)
|
||
|
||
# 4. 配置文件
|
||
cp config.json.example config.json
|
||
# 根据需要编辑 config.json
|
||
```
|
||
|
||
### 3. 启动服务
|
||
|
||
```bash
|
||
python capcut_server.py # 启动HTTP API服务器, 默认端口: 9001
|
||
|
||
python mcp_server.py # 启动 MCP 协议服务,支持 stdio 通信
|
||
```
|
||
|
||
## MCP 集成指南
|
||
|
||
[MCP 文档](./MCP_文档_中文.md) • [MCP English Guide](./MCP_Documentation_English.md)
|
||
|
||
### 1. 客户端配置
|
||
|
||
创建或更新 `mcp_config.json` 配置文件:
|
||
|
||
```json
|
||
{
|
||
"mcpServers": {
|
||
"capcut-api": {
|
||
"command": "python3",
|
||
"args": ["mcp_server.py"],
|
||
"cwd": "/path/to/CapCutAPI",
|
||
"env": {
|
||
"PYTHONPATH": "/path/to/CapCutAPI",
|
||
"DEBUG": "0"
|
||
}
|
||
}
|
||
}
|
||
}
|
||
```
|
||
|
||
### 2. 连接测试
|
||
|
||
```bash
|
||
# 测试 MCP 连接
|
||
python test_mcp_client.py
|
||
|
||
# 预期输出
|
||
✅ MCP 服务器启动成功
|
||
✅ 获取到 11 个可用工具
|
||
✅ 草稿创建测试通过
|
||
```
|
||
|
||
## 使用示例
|
||
|
||
### 1. API 示例
|
||
添加视频素材
|
||
|
||
```python
|
||
import requests
|
||
|
||
# 添加背景视频
|
||
response = requests.post("http://localhost:9001/add_video", json={
|
||
"video_url": "https://example.com/background.mp4",
|
||
"start": 0,
|
||
"end": 10
|
||
"volume": 0.8,
|
||
"transition": "fade_in"
|
||
})
|
||
|
||
print(f"视频添加结果: {response.json()}")
|
||
```
|
||
|
||
创建样式文本
|
||
|
||
```python
|
||
import requests
|
||
|
||
# 添加标题文字
|
||
response = requests.post("http://localhost:9001/add_text", json={
|
||
"text": "欢迎使用 CapCutAPI",
|
||
"start": 0,
|
||
"end": 5,
|
||
"font": "思源黑体",
|
||
"font_color": "#FFD700",
|
||
"font_size": 48,
|
||
"shadow_enabled": True,
|
||
"background_color": "#000000"
|
||
})
|
||
|
||
print(f"文本添加结果: {response.json()}")
|
||
```
|
||
|
||
可以在`example.py`文件中获取更多示例。
|
||
|
||
### 2. MCP 协议示例
|
||
|
||
完整工作流程
|
||
|
||
```python
|
||
# 1. 创建新项目
|
||
draft = mcp_client.call_tool("create_draft", {
|
||
"width": 1080,
|
||
"height": 1920
|
||
})
|
||
draft_id = draft["result"]["draft_id"]
|
||
|
||
# 2. 添加背景视频
|
||
mcp_client.call_tool("add_video", {
|
||
"video_url": "https://example.com/bg.mp4",
|
||
"draft_id": draft_id,
|
||
"start": 0,
|
||
"end": 10,
|
||
"volume": 0.6
|
||
})
|
||
|
||
# 3. 添加标题文字
|
||
mcp_client.call_tool("add_text", {
|
||
"text": "AI 驱动的视频制作",
|
||
"draft_id": draft_id,
|
||
"start": 1,
|
||
"end": 6,
|
||
"font_size": 56,
|
||
"shadow_enabled": True,
|
||
"background_color": "#1E1E1E"
|
||
})
|
||
|
||
# 4. 添加关键帧动画
|
||
mcp_client.call_tool("add_video_keyframe", {
|
||
"draft_id": draft_id,
|
||
"track_name": "main",
|
||
"property_types": ["scale_x", "scale_y", "alpha"],
|
||
"times": [0, 2, 4],
|
||
"values": ["1.0", "1.2", "0.8"]
|
||
})
|
||
|
||
# 5. 保存项目
|
||
result = mcp_client.call_tool("save_draft", {
|
||
"draft_id": draft_id
|
||
})
|
||
|
||
print(f"项目已保存: {result['result']['draft_url']}")
|
||
```
|
||
高级文本效果
|
||
|
||
```python
|
||
# 多样式彩色文本
|
||
mcp_client.call_tool("add_text", {
|
||
"text": "彩色文字效果展示",
|
||
"draft_id": draft_id,
|
||
"start": 2,
|
||
"end": 8,
|
||
"font_size": 42,
|
||
"shadow_enabled": True,
|
||
"shadow_color": "#FFFFFF",
|
||
"background_alpha": 0.8,
|
||
"background_round_radius": 20,
|
||
"text_styles": [
|
||
{"start": 0, "end": 2, "font_color": "#FF6B6B"},
|
||
{"start": 2, "end": 4, "font_color": "#4ECDC4"},
|
||
{"start": 4, "end": 6, "font_color": "#45B7D1"}
|
||
]
|
||
})
|
||
```
|
||
|
||
### 3. 下载草稿
|
||
|
||
调用 `save_draft` 会在`capcut_server.py`当前目录下生成一个 `dfd_` 开头的文件夹,将其复制到剪映/CapCut 草稿目录,即可在应用中看到生成的草稿。
|
||
|
||
## 模版
|
||
我们汇总了一些模版,放在`pattern`文件夹下。
|
||
|
||
## 社区与支持
|
||
|
||
我们欢迎各种形式的贡献!我们的迭代规则:
|
||
|
||
- 禁止直接向main提交pr
|
||
- 可以向dev分支提交pr
|
||
- 每周一从dev合并到main分支,并发版
|
||
|
||
|
||
## 进群交流
|
||

|
||
|
||
|
||
|
||
- 反馈问题
|
||
- 功能建议
|
||
- 最新消息
|
||
|
||
### 🤝 合作机会
|
||
|
||
- **出海视频制作**: 想要利用这个API批量制作出海视频吗?我提供免费的咨询服务,帮助你利用这个API制作。相应的,我要将制作的工作流模板放到这个项目中的template目录中**开源**出来。
|
||
|
||
- **加入我们**: 我们的目标是提供稳定可靠的视频剪辑工具,方便融合AI生成的图片/视频/语音。如果你有兴趣,可以先从将工程里的中文翻译成英文开始!提交pr,我会看到。更深入的,还有MCP剪辑Agent, web剪辑端,云渲染这三个模块代码还没有开源出来。
|
||
|
||
- **联系方式**:
|
||
- 微信:sguann
|
||
- 抖音:剪映草稿助手
|
||
|
||
|
||
## 📈 Star History
|
||
|
||
<div align="center">
|
||
|
||
[](https://www.star-history.com/#sun-guannan/CapCutAPI&Date)
|
||
|
||

|
||

|
||

|
||

|
||

|
||
|
||
</div>
|
||
|
||
*Made with ❤️ by the CapCutAPI Community*
|
||
|
||
</div>
|